Table of Contents
Introduction
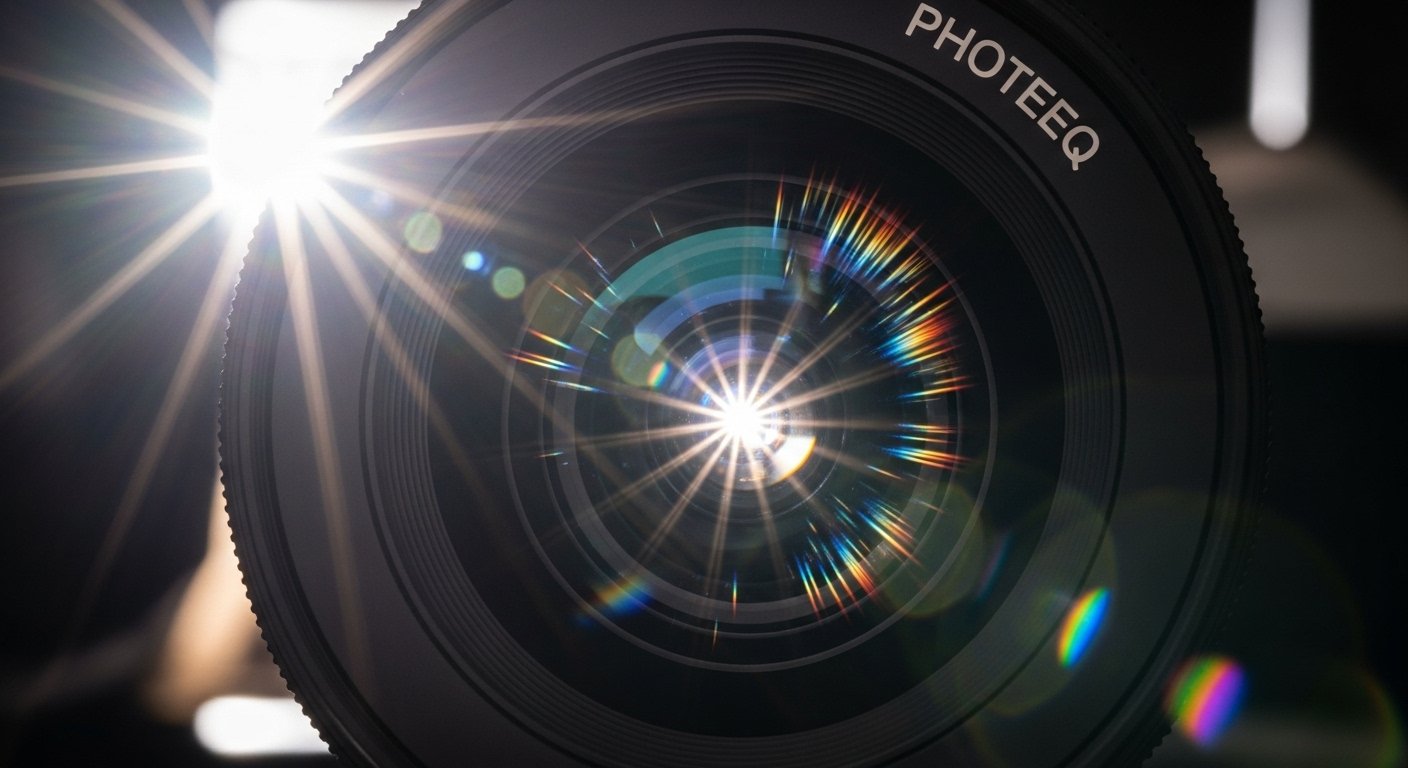
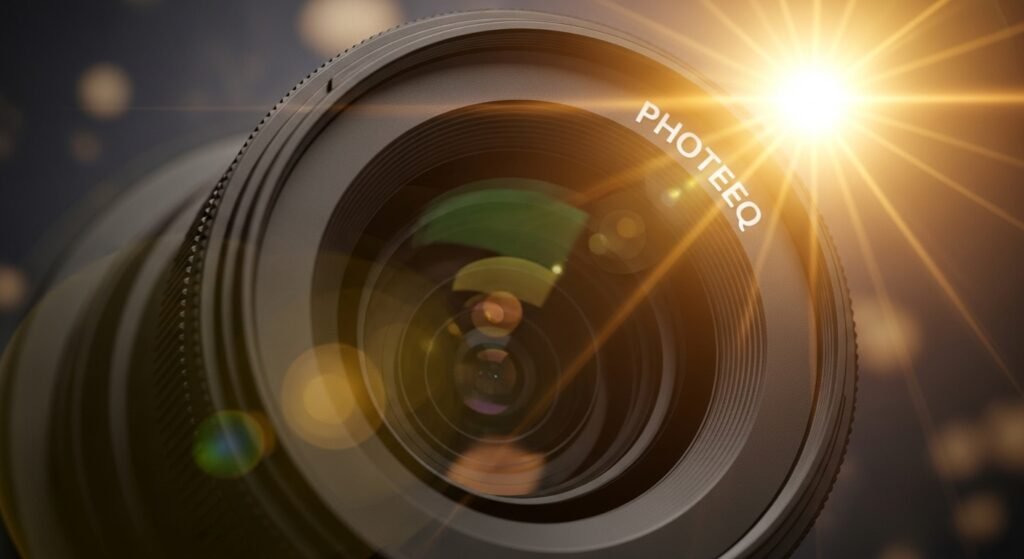
Have you ever seen photos that seem to glow with sunlight or sparkle with light rays? That beautiful effect is often called a lens flare. It makes pictures feel bright and dreamy, like they’re from a movie. But guess what? You don’t need a fancy camera or super editing skills to get that look. Thanks to tools like the Photeeq lens flare, anyone can do it—even if you’re just starting out.
Photeeq lens flare is a photo editing effect found in Photeeq, a plugin that works inside programs like Adobe Photoshop. With just a few clicks, it lets you add natural-looking light flares to your pictures. It’s perfect for making portraits warmer, sunsets more magical, or even rainy scenes feel full of light and life.
In this guide, we’ll explore everything about Photeeq lens flare—what it is, how to use it, and why it’s become a favorite of editors, photographers, and hobbyists. Ready to learn how to add a little sparkle to your photos? Let’s go!
How Lens Flares Make Photos Feel Magical
Lens flare isn’t just a glowing dot in a photo. It’s a way to add emotion and atmosphere. Back in the old days, flare happened when light hit a camera’s lens the wrong way. It was an accident. Now? It’s a trend. Photographers love using it on purpose to make photos feel warm, dreamy, or dramatic.
The Photeeq lens flare tool takes that same natural effect and makes it easy to recreate in your photos. Whether you’re editing portraits, landscapes, or city shots, a soft lens flare can make your images look more alive.
Have you seen photos where the sun peeks through trees, and everything feels golden? That’s the lens flare effect. With Photeeq, you can add that glow, even when it wasn’t there in real life.
Where to Get Photeeq and Lens Flare Tools
To start using Photeeq lens flare, you’ll need the Photeeq plugin. It works with programs like Photoshop and Lightroom. Downloading it is easy—just go to the Photeeq website, install the plugin, and restart your editing app. Once installed, you’ll see Photeeq appear in your list of tools or filters.
Inside the plugin, you’ll find various effects like filters, color corrections, and lens flares. The interface is beginner-friendly. You don’t need editing experience to try it. Just pick a photo, open Photeeq, and start exploring.
The lens flare tool within Photeeq is well-loved because it offers ready-made flare effects you can drag and drop onto any photo. You can also move them around and change how bright or soft they look. Simple, fun, and powerful!
Why Use Photeeq Lens Flare Instead of Free Effects?
There are many apps with simple light effects. But the Photeeq lens flare stands out because it looks real. Fake lens flares often look too bright, too sharp, or too cartoonish. With Photeeq, the flares melt naturally into the scene. They blend. They shine without being too much.
Even more, you can adjust the angle, color, softness, and brightness of each flare. Want a golden sunset look? Done. Want a cool blue sci-fi glow? You have that too.
Photeeq gives you control. And that means you can match your lens flare to your photo’s mood, lighting, and colors. It’s not just a sticker—it’s a real editing effect designed to impress.
When Should You Use a Lens Flare?
The Photeeq lens flare tool is fun, but you don’t need to use it on every photo. It works best when you’re trying to create a certain feeling.
Here are some moments where a lens flare is perfect:
- Sunsets and sunrises: Add a warm flare to make the sky glow more
- Portraits: Light up dark edges to soften and brighten the mood
- Nature photos: Use a soft line of flare for forests or fields
- City streets: Add dramatic light to nighttime photos
- Wedding or family shots: Highlight emotional, joyful moments
The trick is to use the flare gently. You want the viewer to feel the light, not be blinded by it. Keep it subtle, and it turns a simple photo into a storytelling moment.
Steps to Add a Photeeq Lens Flare to a Photo
Ready to try it? Here’s a quick step-by-step guide on how to use the Photeeq lens flare:
- Open your photo in Photoshop or a photo editor that supports Photeeq
- Launch the Photeeq plugin through the filter menu
- Choose the lens flare effect from the preset options
- Click and drag the flare to place it naturally in your photo
- Adjust intensity, size, and direction to match your light source
- Preview your photo, then click apply
- Save your image—you now have a glowing new edit!
It really is that easy. Play with it a few times, and you’ll become a pro in no time.
Tips to Make Flare Look Real With Photeeq
Want to know the secret to making your Photeeq lens flare edits look like real camera shots? It’s all about blending and light direction.
Here are some helpful tips:
- Match the flare angle to your light source. If the sun is coming from the right, place your flare there too.
- Use a low brightness setting. You can always add more, but too much looks fake.
- Add soft blur to the flare to make it blend into the background.
- Zoom out and look at the whole photo. Does the flare feel natural?
- Try using it at the edge of your photo frame instead of the center for a more realistic effect
Small changes make a big difference. With these tips, your Photeeq lens flare edits will wow everyone.
Popular Types of Lens Flare Styles in Photeeq
Photeeq offers several kinds of lens flares. Each one has a different mood. Let’s check out a few favorites:
- Starburst flares: Bright, glowy, and perfect for dramatic skies
- Ring flares: Circular effects that work great for photos taken near water
- Streak flares: Thin lines of light, excellent for city or nighttime shots
- Glow flares: A soft, dreamy glow used in nature and portraits
- Color flares: Light tinted in gold, blue, pink, or more, great for matching tones in your photo
Each style can be adjusted to suit your image, so you’ll never run out of ways to edit creatively.
Photeeq Lens Flare for Social Media Content
Want to make your pictures stand out on Instagram or Facebook? The Photeeq lens flare can help. Bright edits catch people’s attention while scrolling. A soft sun-flare in a selfie or a golden glow in a beach photo can totally change a post’s mood.
Social media is full of visual noise, but soft light flares look professional and add creative polish. This can make a big difference for travel pages, influencers, family albums, or even small businesses using visuals for promotion.
And since Photeeq works with popular editing programs, you can take your best shots from your phone, import them, add a lens flare, and upload with a unique, magical touch.
Using Photeeq Lens Flare in Graphic Design
Using Photeeq lens flare isn’t just for photos. Designers can add flares to banners, posters, event flyers, and advertising images. The flares help draw the eye and create emotion.
For example:
- A golden glow can grab attention in a summer sale flyer
- A blue lens flare can add mystery to a sci-fi event poster
- Soft light scattered across a music album cover adds mood
Lens flares help bring design to life and give depth to otherwise flat graphics. And Photeeq makes it easy through simple placement and adjustment tools.
Can Beginners Use the Photeeq Lens Flare Tool?
Absolutely! One of the best things about Photeeq lens flare is that it’s made with beginners in mind. The interface is clean and easy to follow. You don’t need layers, channels, or deep Photoshop skills to get started.
Each flare option includes a preview. You can also undo any changes without ruining your original photo. That’s why so many new editors love Photeeq—it lets them feel like pros even while learning.
Start small. Use just one flare in an image. Adjust it lightly. Over time, you’ll learn more about angles, blending, and color matching.
It’s fun, not stressful. Just explore and enjoy the process.
Real-Life Examples of Photeeq Lens Flare Edits
Let’s look at a few real examples of how people have used the Photeeq lens flare to transform their photos.
Emma, a wedding photographer, loves to add a golden flare to outdoor ceremonies. She says it gives every image a magical, dreamy glow, even on cloudy days.
Jason, an adventure blogger, adds blue-tinted flares to his nighttime mountain shots. The flares help create mystery and depth, making his page truly unique.
Maya, a parent, uses soft glow flares in her kids’ park photos to create unforgettable family images. They look like warm memories frozen in time.
In each case, Photeeq lens flare added emotion and light to already special pictures.
FAQs
1. What is Photeeq lens flare used for?
It’s used to add realistic light flares to photos, creating warm, dreamy, or dramatic effects.
2. Is Photeeq free to use?
Photeeq offers both free and paid options, depending on your editing needs and software version.
3. Can I use Photeeq lens flare in Photoshop?
Yes! Photeeq is a plugin that works with Adobe Photoshop and similar programs.
4. Is the lens flare easy for beginners?
Yes. It’s one of the easiest tools to add visual interest without needing deep editing skills.
5. Do I need an internet connection to use it?
After installation, Photeeq can be used offline within your photo editing software.
6. Are the flares customizable?
Yes. You can move, resize, color-shift, and blend them to match your image perfectly.
Conclusion
The Photeeq lens flare tool brings creativity and realism to your edits. Whether you’re a beginner learning Photoshop or a designer creating pro-level graphics, this tool makes it fun and easy to add magical light to your images.
With just a few clicks, your photos can shine brighter. From sunsets to studio portraits, there’s always a way to use a little light to tell a better story.
So why not try it? Download the Photeeq plugin, test the lens flare feature, and see your photos transform right before your eyes.